Magento 1 – Create Menu under System > Configuration
You need to add a configuration page for your feature that you added and the proper way would be to add a menu in the System > Configuration and the question is how to do that as fast as possible?!
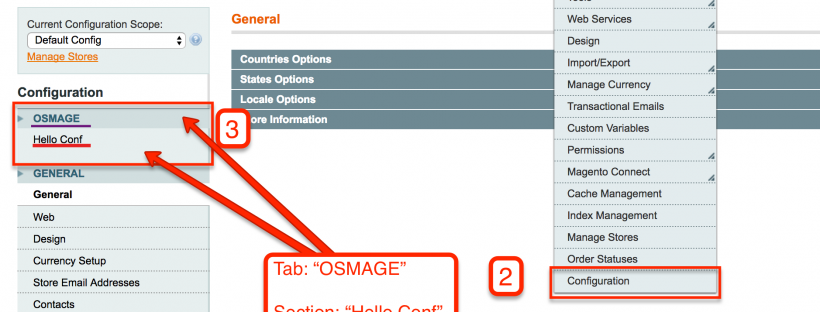
The end result should look like this:

Now, the implementation.
- Create a Module, mine will have the following details (I will cover the creation of a module in another post):
- Namespace: Osmage
- Module: Helloconf
- Create the TAB (Menu Item): In order to create the OSMAGE tab in the left sidebar we should add the file system.xml to etc folder with the following content:
# file location
code/local/Osmage/Helloconf/etc/system.xml
<!-- # file content # -->
<?xml version="1.0" encoding="UTF-8"?>
<config>
    <tabs>
        <osmage translate="label" module="helloconf">
            <label>Hello Conf</label>
            <sort_order>400</sort_order>
        </osmage>
    </tabs>
</config>
Explaining:
- <osmage/> – an unique node name(anything you want) identifying your tab.
- “helloconf” – attribute identifies which module this tab “belongs” to.
- <label/> – tab name
- <sort_order/> – the tabs are sorted in ASC order so lower the number higher will the tab place be in left sidebar.Note: at this point if you reload the page you could see one of this:
– The page will load as expected, but without your new tab because is missing the section tag.
– You’ll get an error something like the following:Fatal error: Class 'Mage_Helloconf_Helper_Data' not found in
That’s because the systems assumes you should have a helper class and if you don’t then you should add one :
File: app/code/local/Osmage/Helloconf/etc/config.xml

<!-- ... -->
<global>
    <!-- ... -->
    <helpers>
        <helloconf>
            <class>Osmage_Helloconf_Helper</class>
        </helloworld>
    </helpers>
    <!-- ... -->
</global>
<!-- ... -->
- Create Section (Sub Menu Item): The section is in fact the submenu that goes under the main menu (tab). We can add the section to an existing tab (eg: Advanced, Catalog) or to the one that we just created. The tab will not be displayed till a section is added.
<!-- # file content # --> app/code/local/Osmage/Helloconf/etc/system.xml <config> <tabs> <osmage translate="label" module="helloconf"> <label>Hello Config</label> <sort_order>400</sort_order> </osmage> </tabs> <sections> <helloconf_options translate="label" module="helloconf"> <label>Hello Config Options</label> <class>hello-options-menu</class> <tab>osmage</tab> <frontend_type>text</frontend_type> <sort_order>1000</sort_order> <show_in_default>1</show_in_default> <show_in_website>1</show_in_website> <show_in_store>1</show_in_store> <!-- Start page configuration --> <groups> <!-- ... --> </groups> <!-- End page configuration --> </helloconf_options> </sections> </config>- <helloconf_options /> – identifier for section
- <label /> – Menu name
- <class /> – you can add a class which later can be styled
- <tab /> – to what tab (menu) is this section attached
- <frontend_type /> – this doesn’t have a real functionality (in our case) but it is mandatory
- <sort_order/> – position of the menu
- <show_in_default/>– boolean value, defines the scope – if to show the menu in default view
- <show_in_website/> – boolean value, show/hide in website view.
- <show_in_store/> – boolean, show/hide in store.
At this point, you have the menu (we achived what we needed) but if you press the menu you’ll get a blank 404 page.
That’s because we need to setup the Access Control List (ACL) as the Adminhtml application can’t find an entry for our new section in ACL.
The ACL code can be added in 2 places:
- In config.xml as a separate element
- Create a new file: adminhtml.xml and add the code there
Both places are being used by Magento.
The ACL is in simple terms an authentication mechanism which will allow a page to be loaded for the current user. This is based on the link you’re loading so basically we need to allow the link to pass the authentication process.
<?xml version="1.0"?>
<config>
    <acl>
        <resources>
            <all>
                <title>Allow Everything</title>
            </all>
            <admin>
                <children>
                    <system>
                        <children>
                            <config>
                                <children>
                                    < helloconf_options>
                                        <title>Networld - All</title>
                                    </helloconf_options>
                                </children>
                            </config>
                        </children>
                    </system>
                </children>
            </admin>
        </resources>
    </acl>
</config>
Within resource, each descending node represents a URI portion.
If you follow that all the way down, you get to the node for our config and the <title /> is what will show up in the Permissions admin.
Note:
This is based on Alan’s Storms article . Thank you Alan for great work.